Adorable Girl Hairstyles From Ordinary to Awesome
Draw Thru Ponytail
Draw Thru Braids are extremely prevalent at the present time, and we have a few force through instructional exercises. This style, was propelled by my great companion Jill Ehat
We truly love the amazing way this draw through looks. It tends to be spruced up or down. Brooklyn has worn this multiple times and has gotten loads of stunning remarks while wearing it.
To see your own photograph entertainments of this style included in our application, don’t hesitate to tag your photographs on IG with:
Things Needed: Brush, rodent tail brush, shower bottle, 1 braid holder, 1 little hair versatile, dry wax and hairspray {if desired}.
Time Requirement: 3-5 minutes
Expertise Level: Easy
Well ordered Instructions
- Get a little segment of hair in the front and best of the head. Secure with a little flexible.
- Give the front a little pull to puff the hair a bit.
- Draw up segments from the two sides, simply under your first segment, and secure with a flexible.
- Take the braid #1 and partition in two segments. Get pig tail #2 and hold it up and out of the work zone. (Brooklyn held it for me)
- #1 ought to be into equal parts and on either side of #2. Get two new segments of hair on the two sides, consolidate with segments from #1 and secure with a flexible. (see video for more points of interest)
- Split the hair from pig tail #2 and rehash the procedure. Get #3, hold off the beaten path. Get two new areas, add to hair from #2 and secure with a flexible.
- Hold #4 off the beaten path. Gather up residual hair into pig tail and secure with substantial flexible. (greater segment of hair needs strong versatile)
- Draw expansive (last braid) up and off the beaten path. Force the two areas from #4 down and under the huge pig tail and secure with little flexible.
- Presently you return and truly draw, puff and cushion your haul out segments.
- I added a bit of prodding to my last braid also to get a decent full look. Include hairspray whenever wanted
- This week on Brooklyn and Bailey… “Pie Face Challenge” Mindy brings home another diversion for the family. Watch to see who gets a pie slapped in their face!
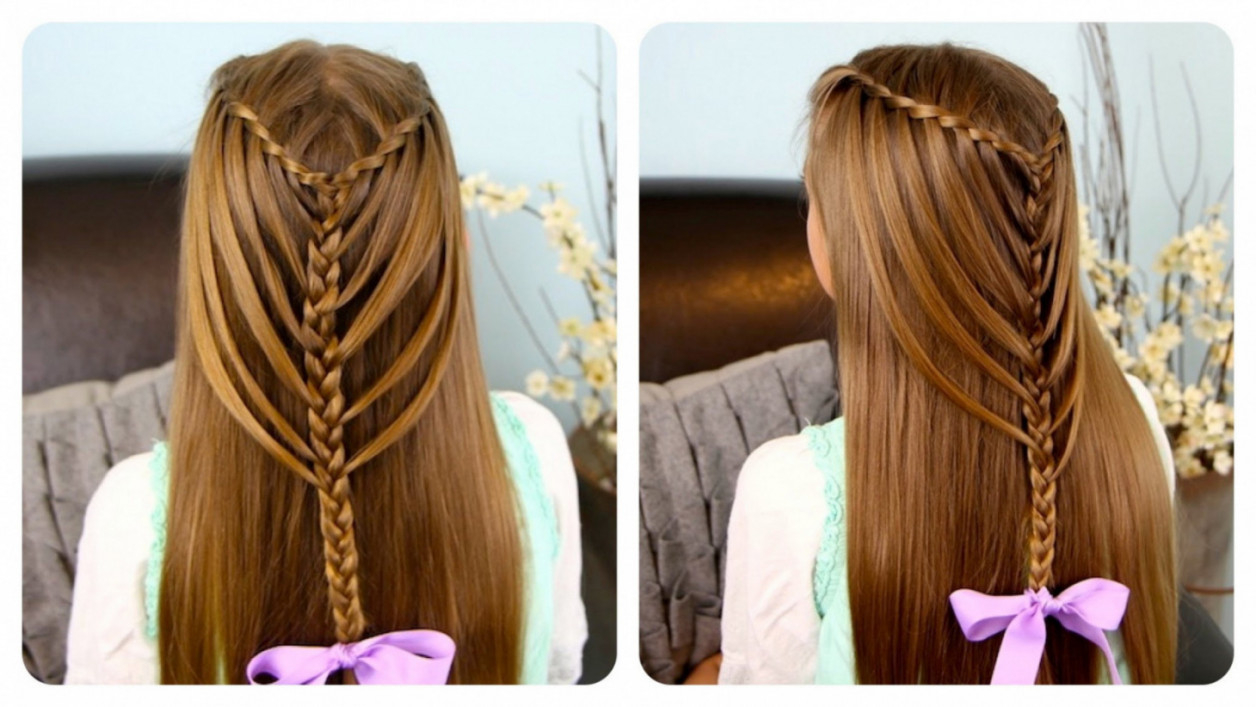
- Half-up Bow Combo
Half-up hairdos like this one are exceptionally famous at the present time. This one happens to utilize a customary 3-strand plait, a fishtail mesh, and a hair bow. Motivation for this interlace originated from my companion @n.stark on Instagram. I really observed her style photograph in a magazine and began to look all starry eyed at it!
This hairdo can be spruced up or down, contingent upon the occasion you are visiting, and it holds up genuinely well on the off chance that you are intending to be dynamic.
To see your very own photograph entertainments of this style included in our application, don’t hesitate to tag your photographs on IG with:
#CGHHalfUpBowCombo
Things Needed: Brush, rodent tail brush, shower bottle, 1 braid holder, 2 little hair elastics, 4-6 little bobby pins, splash wax as well as hairspray {if desired}.
Time Requirement: 8-10 minutes
Ability Level: Hard
- Take a rectangular segment of hair at the highest point of the head. Scoop it back to the crown.
- Separation your segment into three pieces and start a three strand interlace.
- Plait down around 5-6 lines.
- Re-partition the hair into two pieces as you will fishtail the rest of the hair.
- BEFORE you start your fishtail, pull on your three strand mesh and flapjack a bit.
- Presently start the fishtail. Stop en route to hotcake your interlace.
- Complete your fishtail, hotcake and lighten, and secure with a flexible.
- From the front, get the side pieces that we exited down. (See video instructional exercise for more subtle elements)
- Draw the two new side pieces back and secure with a versatile.
- This is the place you will make a bow with the hair. (See video instructional exercise)
- Secure your bow circles with bobby pins, and after that safe your bow focus with bobby pins.
- This week on Brooklyn and Bailey… “Brooklyn BFF Tag” Meet Brooklyns closest companions, Allison and Parker!
- Mermaid Heart Braid | Cute Valentine’s Day Hairstyles
I can’t trust another Valentine’s Day is here! With just half a month to go, it is currently time for another heart hairdo! Valentine’s Day haircuts have turned into a portion of our most prevalent instructional exercise, and this one will be not extraordinary.
This style joins three minimal flexible heartlets with a Mermaid Braid strategy and twists. We’ve worn it a few times, giving the hair a chance to fall straight, joining everything into a straightforward mesh, and here with twists. We cherish how it turns out without fail! Indeed, even as we were taking photographs, mothers were halting us to either remark on the hearts, or ask me how we made them.
To see the whole instructional exercise, just snap underneath!
Presently, you can finish this haircut with either wet or dry hair, it truly relies upon the look you are going for. We’ve done both and they are similarly as excellent in their own particular manner. Today, we are showing you on wet hair, which we know keeps the hair more tightly and the hearts more uniform {adding a little grease helps, too}.
This style was enlivened from a mix of my hairblogging companions, Лена Роговая, Princess Hairstyles and Mimiamassari.
Things Needed: Brush, rodent tail brush, shower bottle, 6 little hair elastics, grease, extra {if desired}.
Time Requirement: 5-8 minutes
Ability Level: Medium
Well ordered Instructions:
Start with wet or dry hair {I find that for the primary attempt, the hair lays better whenever done wet}…
At that point get a segment of hair directly behind every sanctuary. Draw them to the back focal point of the head, apply a tad of grease, and after that safe with a versatile…
Get another little area of hair straightforwardly underneath the initial ones, pulling them to the back of the head, and applying grease, similarly as you did previously…
On your first side, put your pointer and center fingers onto of the segment you just pulled back…
At that point tuck your fingers underneath the main segment you pulled back… .
Presently, put the second strand between those fingers and tenderly draw the strand descending {this ought to make a circling impact around the main strand of hair}…
Rehash Steps #4-6 on the opposite side…
Next, snatch the finishes of the two second strand and secure them together to frame the heart shape {make beyond any doubt you like the state of the heart before you move on}…
Proceed with Steps #4-8 for the two sides until the point that you have three aggregate hearts…
Discretionary: I finished the style with three hearts and twisted the rest with my wand, you could likewise include a straightforward interlace, a fishtail, or proceed with the hearts down the rest of the hair into a full Mermaid Braid.
If you don’t mind leave a remark beneath telling us what you think about this Mermaid Heart Braid! In what mixes would you wear it?
Upbeat Hairstyling!
Ever needed to know what our taping room/studio looks like from behind the cameras? Indeed, this week BrooklynAndBailey give you the whole visit, including a mystery room! Snap beneath to watch it!